[ad_1]
Every Linux admin must install and set up a database at some point. This can include deploying a dynamic website, such as for WordPress, or storing data for web applications as well as customer, client and employee records. Databases are crucial for every type of business.
Linux presents the best platform for databases. It’s a reliable and open source OS with plenty of pre-made databases already available for installation. Of these pre-made databases, MySQL database server is the most popular.
Linux databases
The databases available for Linux range from small, embedded tools such as SQLite to powerful relational databases such as MySQL and even NoSQL databases for big data. Some of the more popular databases available for Linux include:
- PostgreSQL
- MariaDB
- IBM Db2
- Oracle Database
- Firebird
- Amazon Relational Database Service
- Redis
- Ingres
- Hadoop Distributed File System
MySQL represents a complete relational database management system, which means it includes everything necessary for the storage and retrieval of data. It uses the SQL query language, so anyone familiar with that language should be able to use this database easily. Even for those unfamiliar with the SQL language, SQL is designed to be easy to learn and readable.
How to set up a database in Linux
To install and set up a MySQL database on Linux — specifically, Ubuntu Server 20.04 — start by logging into Ubuntu Server and install MySQL with the command:
sudo apt-get install mysql-server -y
Once the installation completes, start and enable the server with the command:
sudo systemctl enable –now mysql
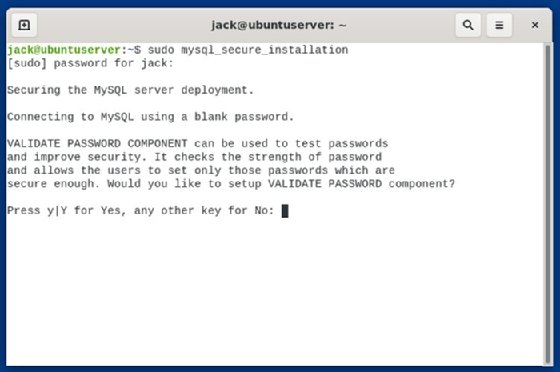
MySQL should now be installed and running. However, the MySQL admin account comes without a password, which presents a security issue. To secure the MySQL installation, issue the command:
sudo mysql_secure_installation
The system first asks if you want to enable the “Validate Password” component, which requires all accounts to use very strong passwords. Type Y to enable this component; otherwise, hit any other key. Even if you don’t enable this component, you can still use strong passwords.
After this step, the system prompts you to type and verify a password for the MySQL admin user. Do that and then answer Y for the remaining questions:
- Remove anonymous users?
- Disallow root login remotely?
- Remove test database and access to it?
- Reload privilege tables now?
Once you have the MySQL database server secured, you can create your first database.
Create a first database
In this tutorial, create a database named techtarget. In order to do that, log in to the MySQL console with the command:
sudo mysql -u root -p
The options are:
- -u, which defines a user (in this case, the root user)
- -p, which prompts for a password
If prompted for the sudo password, type that first and then the MySQL root user password when prompted. You will then find yourself at the MySQL console.
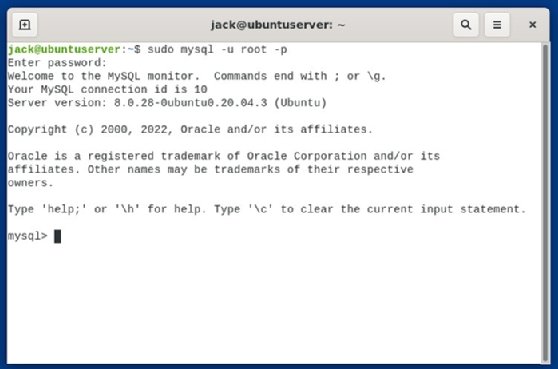
The MySQL console is ready for you to create your first database.
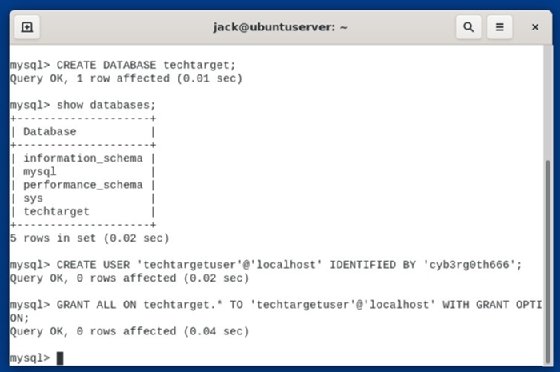
To create the techtarget database, issue the command:
CREATE DATABASE techtarget;
To verify the database’s creation, issue the command:
show databases;
You should see techtarget listed (Figure 3).
Create a new database user with permissions
Next, create a user with permission to access the new database. In this example, create the user techtargetuser with the command:
CREATE USER ‘techtargetuser’@’localhost’ IDENTIFIED BY ‘PASSWORD’;
PASSWORD represents a strong or unique password.
When you create a new user, the user doesn’t automatically have access to the database. For example, when you install WordPress, using the techtarget database and the MySQL admin user presents a security risk. The techtarget database and the techtargetuser account helps mitigate that risk when you give the user access to the database.
Give the user access to the database with the command:
GRANT ALL ON techtarget.* To ‘techtargetuser’@’localhost’ WITH GRANT OPTION;
This command grants all permissions on the techtarget database — and any or all tables, using .* — to techtargetuser on the hosting machine, with the ability to give other users any necessary privileges — handled by GRANT OPTION.
With that in place, when you install WordPress, configure the database details as such:
- Database: techtarget
- Database user: techtargetuser
Once you install a database, you can use your database server to work with all types of applications and services. In most cases, the applications that require MySQL — such as WordPress and Nextcloud — populate those databases during the installation, so you don’t have to manually add tables and data.
[ad_2]
Source link
